Here are a random assortment of items I monogrammed simply with embroidery throughout the fall!
Barb contacted me wanting keyfobs for herself and her husband. I used LP's Taylor font for their names, and DS's keyfob design.
Marci asked me to monogram a couple robes for her:
I used I2S's Fancy Circle monogram
I monogrammed this towel for my friend Amy using EB's Striped Lexi Monogram Alphabet
I made a stay-put towel for Cherri using EB's Chandler Chevron Alphabet
I monogrammed Annaliese's apron (and her doll's apron too!) using 8CP's Satin Split Curlz font
Sabrina asked me to make a keychain for her niece to attach to a lunchbox. I used I2S's Behind These Hazel Eyes
This keychain was ordered for a new college student, we incorporated all three school colors by using 8CP's Two Color Script:
Tarika asked me to monogram a few baby items. Aren't these bibs elegant?
I used I2S's Covered By Your Grace for Joshua
and I2S's Nick for Damon III
and I2S's One Thing for Kendall
Showing posts with label z DS. Show all posts
Friday, December 27, 2013
Misc Monogramming
0
comments
Posted by
Janay at 9:47 AM
Labels: bib, key chain, key fob, robe, stay-put towel, towel, z 8CP, z DS, z EB, z I2S, z LP
Wednesday, August 21, 2013
Look what I got from DigiStitches!
While at Applique Getaway, I had the honor of meeting Jennilee of DigiStitches, and she gave me a special gift!
(oh, and my apologies to Jennilee, I'm confident these were originally packaged with pretty tissue paper and her business card... I restaged this pic a month later :) )
In the bag I found a Monag toddler ruffle tee and baby one-piece.
But look carefully, there is something extra special about these! One of the side seams had intentionally been left unsewn! Jennilee chose me, Me, ME! to test these for her!! Once out of the testing phase these will go into production! EEK!
Check out how much flat work space this provides!
SO EXCITING!
There have been times that I have ripped out side seams in order to ease the process of putting a large design on a small item, but this saves that step!
I first put the toddler ruffle tee to the test. I hooped it the same way I always do (my preferred method is fuse polymesh to inside of shirt, hoop a second piece of stabilizer and use spray adhesive/pins to attach the shirt; you do what works for you). However this was much faster because the open space made it easy to see that my marking lines matched up with the hoop axes. Check out all that open free space at the machine!
From this point I stitched the design as normal (using her I Love Pre-K design) but it was so much easier! At NO POINT did I have to manipulate the shirt to reveal a new part of my hoop, or watch out for the back hem of the shirt which might flop into my stitching area. Now, I couldn't walk away because I had lots of fabric to trim and several thread changes on my single needle :) BUT I was never paranoid and I could multitask!
When it was done, all I had left to do was sew up that open seam. I pinned it together matching all the seams:
I measured the existing serged seam on the other side of the shirt, it was a quarter-inch.
A serger would be helpful, but not required! I took the shirt to my machine and first sewed an exact quarter-inch seam (love that foot with a quarter-inch guide):
Then went back over the edges with an overlocking stitch (a simple zig zag would probably work, too). Final product looks pretty professional!
And here we go, a sweet little tee for a sweet little friend off to her first year of preschool!
What a colorful design, and gotta love those glitter sheets from Hobby Lobby!
I am instantly in love with this concept.
Yes, sewing up the seam is an added step. But the flexibility and reduced stitching stress is SO WORTH IT. I would have dreaded doing this applique (with 7 different elements to trim) the normal way I hoop a traditional tee. This was so much easier.
I cannot wait to give the one-piece a try. I'm going to use DS's Tool Belt. For that design to look best it really needs to stretch across the whole width of the one-piece, but that's hard to hoop! An open side seam is going to simplify the process so much!
Dreaming of 3-6 month sized one-pieces, so when I do my special delivery designs I don't have to do this anymore. Doesn't that raise your blood pressure a bit just looking at it?! I've done nearly 100 of them this way...
Remember, you saw it HERE first!
:)
(oh, and my apologies to Jennilee, I'm confident these were originally packaged with pretty tissue paper and her business card... I restaged this pic a month later :) )
In the bag I found a Monag toddler ruffle tee and baby one-piece.
But look carefully, there is something extra special about these! One of the side seams had intentionally been left unsewn! Jennilee chose me, Me, ME! to test these for her!! Once out of the testing phase these will go into production! EEK!
SO EXCITING!
There have been times that I have ripped out side seams in order to ease the process of putting a large design on a small item, but this saves that step!
I first put the toddler ruffle tee to the test. I hooped it the same way I always do (my preferred method is fuse polymesh to inside of shirt, hoop a second piece of stabilizer and use spray adhesive/pins to attach the shirt; you do what works for you). However this was much faster because the open space made it easy to see that my marking lines matched up with the hoop axes. Check out all that open free space at the machine!
From this point I stitched the design as normal (using her I Love Pre-K design) but it was so much easier! At NO POINT did I have to manipulate the shirt to reveal a new part of my hoop, or watch out for the back hem of the shirt which might flop into my stitching area. Now, I couldn't walk away because I had lots of fabric to trim and several thread changes on my single needle :) BUT I was never paranoid and I could multitask!
When it was done, all I had left to do was sew up that open seam. I pinned it together matching all the seams:
I measured the existing serged seam on the other side of the shirt, it was a quarter-inch.
A serger would be helpful, but not required! I took the shirt to my machine and first sewed an exact quarter-inch seam (love that foot with a quarter-inch guide):
Then went back over the edges with an overlocking stitch (a simple zig zag would probably work, too). Final product looks pretty professional!
And here we go, a sweet little tee for a sweet little friend off to her first year of preschool!
I am instantly in love with this concept.
Yes, sewing up the seam is an added step. But the flexibility and reduced stitching stress is SO WORTH IT. I would have dreaded doing this applique (with 7 different elements to trim) the normal way I hoop a traditional tee. This was so much easier.
I cannot wait to give the one-piece a try. I'm going to use DS's Tool Belt. For that design to look best it really needs to stretch across the whole width of the one-piece, but that's hard to hoop! An open side seam is going to simplify the process so much!
Dreaming of 3-6 month sized one-pieces, so when I do my special delivery designs I don't have to do this anymore. Doesn't that raise your blood pressure a bit just looking at it?! I've done nearly 100 of them this way...
In summary...
DigiStitches has partnered with Monag and is putting open side seam shirts into production... more info soon!!! Remember, you saw it HERE first!
:)
Thursday, May 23, 2013
Misc. Monogramming
1 comments
Posted by
Janay at 9:27 PM
Labels: apron, bag, bib, hat, key fob, z 8CP, z DS, z I2S, z LP
Recent random monogramming projects...
A pretty monogram on an apron. This was my first time using 8CP's Monogram 3. I have no idea why I waited so long, I really like it! It needs to get in my rotation! (oh, and it has, I monogrammed my swimsuit coverup after doing this apron.)
Monogrammed bib for Caden. I used 8CP's Pops.
Added a quick monogram to this shirt. Annaliese picked 8CP's Be Mine. Pardon the pic, the shirt has been worn and washed several times, but the "completeist" in me requires that it be posted. ha!
In celebration of our school's 25th anniversary, they had a "dress up like what you want to be in 25 years" day. Annaliese wants to be a movie director, so I used 8CP's Skinny to add DIRECTOR to this hat:
I made a new key fob for myself! DigiStitches Quilted Key Fob 2, Itch 2 Stitch Fancy Circle Monogram, Vera Bradley napkin to match my bag:
And my friend Rebecca mentioned wanting to get some Publix bags before she leaves the south. I still had a couple of these pretty blue ones in my stash, so like the previous ones I have done for teachers, I added her monogram with LP's Taylor font.
A pretty monogram on an apron. This was my first time using 8CP's Monogram 3. I have no idea why I waited so long, I really like it! It needs to get in my rotation! (oh, and it has, I monogrammed my swimsuit coverup after doing this apron.)
Monogrammed bib for Caden. I used 8CP's Pops.
Added a quick monogram to this shirt. Annaliese picked 8CP's Be Mine. Pardon the pic, the shirt has been worn and washed several times, but the "completeist" in me requires that it be posted. ha!
In celebration of our school's 25th anniversary, they had a "dress up like what you want to be in 25 years" day. Annaliese wants to be a movie director, so I used 8CP's Skinny to add DIRECTOR to this hat:
And my friend Rebecca mentioned wanting to get some Publix bags before she leaves the south. I still had a couple of these pretty blue ones in my stash, so like the previous ones I have done for teachers, I added her monogram with LP's Taylor font.
Wednesday, September 19, 2012
A quick key fob (and how I save stabilizer)
Yesterday late afternoon Annaliese exclaimed, "Oh Mom! My teacher's birthday is tomorrow!" I guess she had known for a few days but just at that moment remembered to tell me. At least it was better than last year when she said, "my teacher's birthday was today." So we are making progress... maybe next year I'll get even more notice!
I love DigiStitches Quilted Key Fobs! Such a fun, practical and quick gift. And check out this adorable fabric my MIL found for me -- the owls are so tiny!! Just perfect for a Springwood teacher.
I shared in December how I like to mass produce key fobs -- it goes quickly and really reduces waste. But what about when you only need to make one? To avoid wasting a whole piece of stabilizer cut to fit my 6x10 hoop, I do the following.
Cut a long piece of stabilizer and place hoop at left end.
Instead of stitching the key fob in the center of the center of the hoop, I positioned it as far left as possible. Note the excess stabilizer is rolled up on the right hand side.
The mark on the excess stabilizer shows where I would have cut the stabilizer for a traditional hooping:
I use my rotary cutter to precisely trim a 1/4" seam allowance.
Look how much stabilizer I saved by using this technique -- over 6 inches!!
That 6" strip would be in my trash can if I had cut a piece to fit and stitched the key fob in the center. But instead that 6 inches is still connected to a large piece of stabilizer, ready to use on my next project. It may not seem that significant, but it can add up fast! :)
Thursday, April 12, 2012
Priceless gifts :)
3
comments
Posted by
Janay at 6:38 PM
Labels: applique, burp cloth, Fitz, onesie, shirt, z 8CP, z DS
My dear friends Jason and Anna contacted me about making a gift set for our mutual friends that were expecting a baby girl. They were keeping her name a secret until birth, so we had to be a touch more creative.
Jason really wanted to incorporate their last name, Price, into a gift in a clever way. We settled on "Priceless", isn't that perfect for a little girl?!?
I used the Sherry font from 8 Claws and a Paw, and added a crown that I plucked off of another design... no record of that one though!
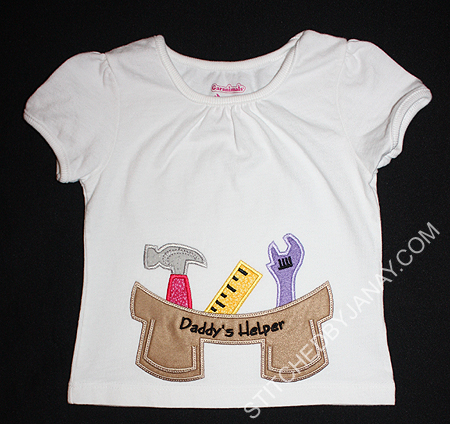
Daddy owns his own business as a contractor, so Anna suggested a tool belt shirt:
This adorable tool belt applique design from DigiStitches. I used a brown suede-like material for the belt, and added "Daddy's Helper" with Embird Alphabet #14.
And finally, Jason is a big nerd :) and wanted to share his nerdyness with sweet baby Price, even though Mom and Dad really aren't nerds themselves. This definitely reflects who it's from more than who it's for. :)
(I digitized this for personal use only)
Wednesday, September 21, 2011
Miscellaneous Stitching...
Eh, I'm trying to catch up. I have a bunch of little stuff that I've done over the past few months but haven't shared yet. So I'm going to throw them all at you in one big post.
Monogrammed Flower Flip Flops -- I put all the design and how-to details in a blog post earlier this year, you can find it here. I made three more pairs at the end of July:
Key Chains:
Sabrina asked me to make one for her niece, and Rebekah asked me to make a couple for her daughter... these are being used as name tags on back packs and lunch boxes, made from 1.5" ribbon and D-rings:
Key Fobs:
Last weekend our family attended a fun shindig, and what better gift do you take to a sweet sixteen party than a key fob?? It also makes an awesome gift for Annaliese's teacher, whose birthday was this week.
(Quick side note: if you make DigiStitches key fobs, or really any thing that requires a tube that needs to be turned, you MUST get this Quick Turn tool. WOW it makes it unbelievably easy and fast to turn something right side out!!)
And finally my big project of the week... 10 more aprons like the ones I made earlier in the summer.
This was an exciting and successful experiment in running both machines at the same time. What would have taken me over two and a half hours on one machine I got done in less than an hour and a half. Woo-hoo! I won't be able to do this very often, but 2-color embroidery-only designs on aprons was doable. And can only be done when I'm home alone. It's pretty loud, so I don't want to wake sleeping children, or not be able to hear what is going on outside of my room. Or be distracted, that could be disastrous. :)
Subscribe to:
Posts (Atom)