Sunday, October 13, 2013

Banner for Miller

0 comments
Another baby shower a few weeks ago meant another name banner!
This time though, I went straight to the momma for fabric. Miller's mom is a great seamstress and had made the crib bedding herself. So when I was commissioned to make the name banner (using the Frayed Block Letters from Hang To Dry), I asked my friend Katie for scraps. I figured it would be better to use the exact same fabrics than guess at grays and oranges. And lucky me,  pregnancy brain prevented her from deducing why I asked for it. Ha!
My original plan was to alternate gray and orange, but then when I saw there were three gray/white patterns and one solid orange I decided to try something new. I used orange flannel (instead of white) and orange on the back with the gray prints on the top. I did the quilting in orange, and then when I trimmed, I trimmed the gray closer to the design, leaving an orange border around each letter. It was a bit more tedious, but I really like how it turned out! I tied them all together with the solid orange as well.
Here it is hanging above Miller's crib! The wall was just waiting for the banner :)

Wednesday, October 9, 2013

Not-so-recent Burp Cloths

0 comments
I have been a busy girl in the embroidery world, but I'm having a hard time finding time for my blog!
I made these cute burp cloths a while back... I couldn't post pics immediately because they were gifts, and by the time it was safe, well... I just forgot! But I love each of them!
My favorite customer picks such cute designs for me to use on her orders :)
Joshua got Itch 2 Stitch's Sea Turtle Box, and I added his name with I2S's Jack and Jill.
Miller got Savvy Stitches Elephant holding balloon design, and I added the name with I2S's Razzle
and Asara got Embroidery Boutique's Tuscan alpha, and I added her name with 8CP's Southern Belle.


Tuesday, October 8, 2013

How I Monogrammed a Set of Stockings

0 comments
First, I am embarrassed to admit that I have had this project sitting on my table since January. Yes, JANUARY! I agreed to monogram these stockings for a friend back when there was a strong possibility that we might move out of state. When God confirmed that His plan was for us to stay put, there was no longer a rush to get it done... and it continued to get bumped by more time sensitive projects.
But today was the day!
I added the names to these stockings in an amazingly short amount of time... so short that I'm mad at myself for waiting so long. :)
I'm hesitant to agree to monogramming stockings until I can get them in my hands and see how easy they are to lay flat. These fold-down cuffs could be flipped up and maneuvered easily in my single needle (which you will see later) so I proceeded on.
A quick note about the stockings: These were made by the matriarch of the family, who has since passed away. So there was an added amount of pressure to get them perfectly right; I had no room for error. My brain processed for months how I was going to hoop these to ensure the names were straight and all positioned in the same spot. I'm happy to say it was easy and turned out perfectly!
These stockings are not that big, so I planned to use my 4x4 hoop. We picked Embird Alpha #4 (Comic Sans) and I made the longest name (Caroline) 4" wide. The rest of the names were generated at the same settings so they had a consistent size. In the end that makes the short ones (Ray and Lisa) seem a little on the small side when you look at them individually, but I really prefer a consistent look across the board.

The cuffs were all a pretty consistent size (about 7" wide and 2 1/8" tall). So I modified Embird's built in basting stitch to create top and bottom lines that were exactly 2.125 inches apart, with little notches where the center was. That created a nice window for me to be sure the names were visually centered both horizontally and vertically. (For Ashley and Ray I ignored those dangly Ys and visually centered the capital letters; all names had the baseline in the same position.)
Now for the super fast hooping!
Disclaimer: This may not be the most sound hooping technique ever and has potential for error so please practice before using sentimental items!
I hooped sticky stabilizer and ran the placement lines directly on the stabilizer (sorry, I should have used a dark thread so you could see better!):
 
I measured and marked the center of the cuff with a straight pin:
Then I lined up the stocking on my hoop with edge along the stitched line and straight pin at the center notch:
Then I pinned the stocking (outside the stitch area) to the sticky for extra measure and headed back to my machine to stitch the name. (I did remove that center marking pin before hitting start :) )
Here's where the cheap conservation lady kicks in -- I VERY CAREFULLY removed the stocking from the sticky stabilizer WITHOUT unhooping. That sticky stabilizer is still usable!!
I lined up another stocking, floated a scrap of tearaway underneath, pinned the stocking, sticky and floated tearaway all together, and stitched stocking #2!
and #3, and #4, and #5, and #6.... Check out my stabilizer at the end! At this point the stickiness of the stabilizer is basically gone so I would have needed to start over with a new piece of sticky stabilizer. Thankfully I was done. :)
I'm super pleased with how this turned out. Not only was it a fast way of cranking through them, it ensured that every single name was the exact same distance from the bottom of the cuff, centered and straight with no worries!

So there you go. Writing this blog post literally took longer than monogramming the stockings from start to finish. I hope this helps on your next stocking project!


And now a moment for true confessions:
I created the designs, embroidered the stockings, photographed them, edited the pics, wrote and published this entire blog post... and THEN noticed that Ray's name was in fact smaller than the rest. It took me a moment to figure out why, but I remembered that I created his name separate from the rest, and the size settings in Embird must have returned to the default setting without me realizing it. UGH. So I picked out the stitches (which took longer than all of the above combined) and redid the name. Bah. It originally was a fast project... :)

Friday, September 27, 2013

Less than three months until Christmas...

1 comments
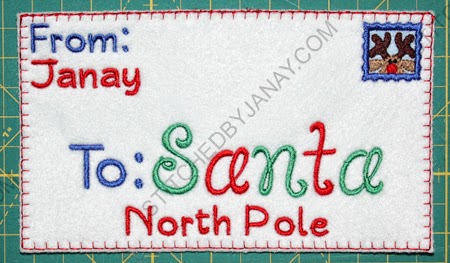
... and I have my letter to Santa written and ready to go!
Hee, hee, hee... what do you think of my note? Do you think I'm on Santa's nice list this year?!

This Santa Letter Envelope design is from Embroidery Boutique. Isn't the applique stamp cute?!
You can also purchase the alphabet (Simple & Cute -- which stitches really well in small sizes) to customize the envelope.
Here's a quick picture of the back. Tacking down the flap is built into this ITH design. I took lots of pictures during the construction process -- they were used in the instructional pdf.
I had fun making this for EB, and enjoyed the excuse to bake cookies. ;)
I'll let you know what I wake up to on Christmas morning!!!

Thursday, September 26, 2013

Sweet Monkey for Joshua

0 comments
Here's a sweet little gift set I made for my friend who just had a baby boy:
The sweet monkey face design is one I got to test for my friend Amy who has just launched a new business! We've gotten to know each other through an applique group, and she also has been a tester for LP (which makes me confident she knows what makes a design excellent). But she graduated out of that to start digitizing herself! Both the 4x4 and 5x7 sizes of this face stitched beautifully. I expect great things from Amy in the future. For now you can find her on Etsy (her shop is Stitch Away Applique) an next week her site Stitch Away Applique should be active.
I added Joshua's name with I2S's Silly Monkey font.

Friday, September 20, 2013

Making my boy happy!

0 comments
Some projects take significant planning, require tons of decisions and meticulous work to create an awesome shirt.
Other times you get a quick idea and throw it together super duper fast.
This was the latter!

My son recently got his hands on my husband's old Batman Beyond action figure and they have been watching episodes on Netflix. Yesterday Dashiell was quite upset with me because his screen print Batman tee was still dirty (where oh where is the laundry fairy?!) and he NEEDED it to dress up as Batman Beyond. I reminded him that his shirt was gray, not black, and had a yellow/black logo, not red, so he would have to use his imagination anyway. That didn't go over well. ;)
Then I thought... hmmmmm... Do I have a black shirt? I sent him off to watch something with his big sister and I cranked this out really fast. LOOK AT THAT SMILE!!!
I have no desire to be a full time digitizer, but it is nice to have digitizing software for times like this. I traced the logo in my software and converted it to a triple bean stitch. I hooped a black tee I got on clearance for $1.25, laid down a piece of red knit and stitched the outline. Trimmed it out and took it back to my son.
His reaction was so cute. Gasped, said thank you, then immediately said, "I have to show this to Daddy!" He changed right away, slept in it, wore it to preschool, and I've promised that if he will wear pjs tonight I will wash it so it's clean in the morning. I hope the newness wears off before Sunday morning! :)

Saturday, September 14, 2013

For I know the plans I have for you

0 comments
This is a 2-for-1 blog post! First the information about some special gifts:

A friend of mine recently had a baby. He is her fourth child and was a surprise :) I wanted to encourage my friend that even though little Luke wasn't planned by mom and dad, God certainly has plans for him! Isn't that great news we can rest in as parents?!
Another friend is expecting her third baby. They already have a boy and a girl, so they are keeping the gender of this one a surprise until delivery. But either way, they will name the baby Miller. Isn't that a neat concept?! So I made a similar set, using gender neutral colors.
Both sets use Itch 2 Stitch's Jeremiah 29:11 Add a Name design, and I added their names with I2S's Rockford.

~~~~~~~~~~~~~~~~~~~
Now a little bit more behind the scenes story that might interest my embroidery friends.
We had an I2S customer struggling with her efforts to put this design on a burp cloth. Since at that moment I had not used the design yet, I decided to test it myself on a burp cloth. I'll be completely honest with you, when I opened the 4x4 design in my software I thought, hmmmm.... I would never choose to use this on a burp cloth. The text was simply too delicate for a thick item IMHO. But I did it anyway. I had no problems at all:
But when you compare the picture of the exact same design on a onesie, you can see what a difference there is between embroidering text on a thick burp cloth and knit onesie. I love the way this turned out with the blues and greens!
In relaying my thoughts to Cristy I told her this is a case where I as a customer would either opt to not use it on a burp cloth, or significantly fiddle with pull compensation in my software. Does that mean there is anything wrong with the original design? NO! I think sometimes we expect EVERY design to be perfect for EVERY situation. And that simply isn't always going to be the case. That's why I LOVE having software to manipulate designs to suit my particular situation.

BUT Cristy decided to go back and update this design, making the text bolder. :) So if you have previously purchased the Jeremiah 29:11 design, you can go back and download a new version! I tested it for her on Miller's set. This is the burp cloth:
and this is the onesie. Still a significant difference between the two items due to thickness, but maybe the design is a bit more versatile now.
Can I say how much I love this 2-for-1 deal?! I got to help trouble shoot with a customer getting her back on track for her own project, and I got to give a really special gift to two of my friends! Best of both worlds!! This huge baby boom going on in my world (FOURTEEN babies since March) has given me so many opportunities to play.

Friday, September 13, 2013

Changes for Janay

6 comments
I know I have been really quiet for the last few months! I promise I haven't completely given up on applique nor my blog. Lots of factors have contributed to my seemingly inactivity... some of my projects are gifts that haven't been received, or designs I've tested that haven't been released by the digitizer. But the bulk of my excuse is that I've been busy doing some behind the scenes things, and my role in the embroidery community is changing! Exciting times!

I've already shared at length how awesome my experience at Applique Getaway was. I included a little throw away line, "There was a lot of hustle and bustle at the very end of the day, the vendors had to pack up and get out pretty quickly. I chatted with Cristy a bit more as I helped take down..." but have kept that particular conversation a secret for quite a while. Wanna know what we talked about?!
Cristy asked about hiring me to help answer emails for The Itch 2 Stitch. !!! I was blown away by the idea and frankly speechless (can you even imagine such a thing?) Once I got home and recovered from my trip, we talked over all the details and I realized this is EXACTLY the type of job I would love to do from home! I agreed to begin when my kids started school. We are about four weeks in, it is going well, and we officially announced the news this week.

So what does this mean for you?
Well, if you are a personal friend or family member that I have sewn for in the past, not much is changing. I'm still available for limited custom orders as time allows. I will not accept orders from the public, I just simply do not have the time, but can refer you on to someone else. Even though my little guy is in preschool five mornings a week, that's not quite as much "free time" as you would think. :) So really this is no change from last school year.

If you are a fellow embroiderer who follows along on my adventures, I hope to continue sharing all of my projects with you as I always have! Even though I am technically a part of The Itch 2 Stitch team, this is still *my* blog. You will see a lot more I2S design and fonts being showcased here in the future, but it's not because I'm required to use them, just that they are adorable and available to me :) or I may do a quick project in an effort to troubleshoot with a customer.
For example... Someone was experiencing an issue on a onesie with this Child of God design. Based on the pictures submitted to us I was pretty sure it was a machine issue (tension), but I personally had not used this design yet. I ran a quick test of it myself to be sure all was in working order. It was! :)
 
I plan to continue to test for Lynnie Pinnie, Embroidery Boutique and 8 Claws and a Paw...
OH and I just got the "I Want it All" CDs from Designs by JuJu... so for sure you will still see projects from our old-time favorites.
I recently tested a design for a brand new digitizer who hasn't even launched a website yet (it's so cute I can't wait to show you!) so I hope to still have time to point you to newbies as well!

Whew, that was long winded. But I felt like I should share my exciting news with you, and give a "full-disclosure" sort of statement. This blogging thing and being active in groups/forums is actually paying off! ;)  Yippy!! Thanks for being a friend of Stitched by Janay. Without my fellow embroiderers I wouldn't have this opportunity!

Sunday, September 1, 2013

Sibling Shirt Sets

0 comments
Here are a couple of recent sibling shirt sets I have done. First for my niece and new nephew:
The Big Sister and Little Mister designs are both from Embroitique. I added their names with 8CP's High 5
 And this set was for a friend back home:
They may look familiar, but actually it's my first time using this exact set... MCA's VINTAGE sibling set. I love the look and the quick stitchout of vintage applique letters, I'm so excited she released this version! I added their name with MCA's Angelina.


Labels


Statcounter

Followers

My Blog List

Stitched By Janay Original Template Copyright 2008, based on Shoppaholic Designed by Ipiet Templates