My in-laws have owned seven Labradors over the course of 20+ years, so when I spotted a certain flannel in the JoAnns Black Friday ad, I knew right away I had to make my MIL a rag quilt for Christmas. On the Wednesday before Thanksgiving I stopped by my local JoAnns to make sure they had it in stock (they did!) and then came home to plot out a quilt and figure out how much I needed to buy. On Black Friday I was at JoAnns by 6:20am and headed straight to the flannel. On my way there I saw the bolt I needed in someone's cutting stack! EEK! I asked if she was buying all of it, thankfully she wasn't. I bought the rest of the bolt and it was JUST ENOUGH. No room for errors on this project!
Even though I had lofty goals to make two rag quilts between Thanksgiving and Christmas, due to circumstances out of my control I wasn't able to finish Kathy's quilt until this week. But I'm pretty sure she has found it worth the wait. :) Here it is!!
I used my AccuQuilt GO! and rag die to cut all the fringed blocks first. Can't say it enough -- I LOVE not having to snip the quilt at the end!! I was very pleased with how the quilting turned out on my Sudoku Rag Quilt, so I asked Julie of 8 Claws and a Paw Embroidery if she would be willing to digitize a bone for me in the same style as her applique tackdown stitches. I sent her an image of the fabric and she sent back a design very quickly! THANK YOU! It worked perfectly! I chose a light teal thread like the bones on the flannel.
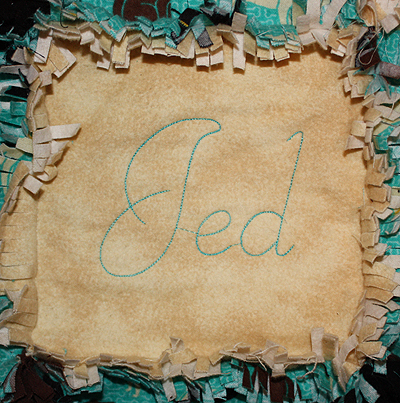
That took care of half of the blocks. The other half were marble/solid flannels to represent the yellow, chocolate and black labs. I used Embird Alphabet #22 (a redwork alphabet) to embroider the names of all the Labradors the Trammels have owned. I was relieved I had a teal thread the exact same color as the dog print, and that it provided a good contrast on both the light and dark blocks! (These pictures were taken before the first machine washing, so the true ragging effect hasn't taken place.)
Their black labs: Lady, Hope and Neo
Their yellow labs: Tig and Jed
Their chocolate labs: Quinn and Forrest
Once I got it all pieced, I shook it, washed it, shook it, dried it, and shook it again! Annaliese said, "it looks like a fluff monster was destroyed on the driveway!" :) Here's the whole quilt:
And a close-up shot:
Showing posts with label rag blanket. Show all posts
Friday, January 21, 2011
Thursday, January 13, 2011
Sudoku Rag Quilt
I have been wanting to make this quilt for a LONG time. (Cue flashback sequence music)
I made my very first rag quilt in the fall of 2006 (Butterfly Quilt given to Annaliese). Shortly after that I made another one for Marc and Pamela. Both of these were done the old fashioned way... I quilted each square using free motion, then pieced, then snipped. LABOR OF LOVE I tell you! That year when we went home for Christmas my MIL and I made a rag quilt for Baby Luchinski, but on this one we experimented using her embroidery machines to do the quilting. It worked really well! (Here's a little Stitched by Janay Trivia -- I used what would become my embroidery machine for that project, I just didn't know it at the time). Then the following February I went on a girls retreat, and while everyone else scrapbooked, I pieced four more rag quilts (back to free motion quilting), with the intention of selling them. That was fun, but the follow up snipping... FOUR of them!!! Well, I was done. They take so long, it's hard to put a fair price on them. Nearly 4 years later, I still have two of them in my closet! :)
Sorry for the brief history lesson. Anyway, at the time I made those quilts my SIL was really into Sudoku puzzles. We both LOVE those puzzles! I saw a quilt pattern based on the game and thought it was perfect! I love how substituting fabric for the numbers makes a perfectly random looking patchwork design. I wanted to make a rag quilt for Amy, but alas, I had lost my drive to snip.
Fast forward to Christmas of 2009 -- I got an AccuQuilt GO! with rag dies!! Now the snipping hindrance had been removed, and I was determined to follow through with my set-aside idea for the following Christmas. I got up dark and early on Black Friday and headed to JoAnns for their annual flannel sale. Even though I own TONS of flannel (purchased on Black Friday 2006) I didn't have 9 different patterns that all coordinate. :)
Here's the end result:
So here's what I did!
In a Sudoku puzzle the numbers 1-9 appear 9 times each, but only once in each row, column and square. My quilt needed nine blocks each of nine different flannels.
I used my rag die to cut two layers of flannel at the same time. I place the same print wrong sides together before running it through the cutter so that my blocks were ready to quilt right after being cut. I find that two layers of flannel is plenty warm!
I assigned a number to each flannel and quilted them. Since this is a number game, I decided the quilting pattern just had to be numbers!! I wanted to use my embroidery machine, but I wanted the design to stitch QUICK since I had 81 of them to do. I decided the placement or tackdown stitch for an applique design would be perfect. I selected the 4" numbers from the Hannah font from 8 Claws and a Paw. They digitize their tackdowns with a nice long-stitch narrow zig-zag that stitched fast and looks more decorative than a simple running stitch -- it was perfect! I hooped my squares with no stabilizer using my Spring Hoop (first time using it-WONDERFUL for this project!) and plowed through them.
Here are closeup images of all nine blocks. My only regret is that I used white thread for all of them... should have used contrasting threads instead. Oh well! The #4 fabric was my inspiration fabric... found it first and the picked pinks, greens and purples to match. And in my opinion #7 looks better in person than in the pictures. :)
I launched my Electric Quilt program and created a quilt that was basically a nine-patch of nine-patches. I found a solved Sudoku puzzle and assigned each number a fabric and plugged it into my quilt. When I made the actual quilt I didn't include the black dividing lines (though considered adding a narrow sashing).
Then I made a tiny version of my quilt with 1" squares of the flannel. This was a VERY helpful step. I was able to see right away that I had two of the same prints side-by-side too often and swapped things around. Then as I was constructing it I had a handy guide to follow to be sure I didn't mess anything up. Because if you know Amy, you know she would certainly find my mistake. :)
With the blocks quilted and the plan in place, all I had left to do was piece the thing together! And here it is, my first Sudoku Rag Quilt!
Close up of the quilt so you can see the raggy seams and quilting:
I love the final product. I was secretly hoping Amy wouldn't like it and they could just ship it back to me. But she did. :) Maybe some day I'll get around to making one for myself. But don't hold your breath. ;)
And for those of you still reading, thanks! This was a special project, and I wanted to document it all for myself. To be honest, I wanted to to a big video tutorial (so I can earn myself a free die from AccuQuilt) but December isn't the best month of the year to tackle a project like that!
I made my very first rag quilt in the fall of 2006 (Butterfly Quilt given to Annaliese). Shortly after that I made another one for Marc and Pamela. Both of these were done the old fashioned way... I quilted each square using free motion, then pieced, then snipped. LABOR OF LOVE I tell you! That year when we went home for Christmas my MIL and I made a rag quilt for Baby Luchinski, but on this one we experimented using her embroidery machines to do the quilting. It worked really well! (Here's a little Stitched by Janay Trivia -- I used what would become my embroidery machine for that project, I just didn't know it at the time). Then the following February I went on a girls retreat, and while everyone else scrapbooked, I pieced four more rag quilts (back to free motion quilting), with the intention of selling them. That was fun, but the follow up snipping... FOUR of them!!! Well, I was done. They take so long, it's hard to put a fair price on them. Nearly 4 years later, I still have two of them in my closet! :)
Sorry for the brief history lesson. Anyway, at the time I made those quilts my SIL was really into Sudoku puzzles. We both LOVE those puzzles! I saw a quilt pattern based on the game and thought it was perfect! I love how substituting fabric for the numbers makes a perfectly random looking patchwork design. I wanted to make a rag quilt for Amy, but alas, I had lost my drive to snip.
Fast forward to Christmas of 2009 -- I got an AccuQuilt GO! with rag dies!! Now the snipping hindrance had been removed, and I was determined to follow through with my set-aside idea for the following Christmas. I got up dark and early on Black Friday and headed to JoAnns for their annual flannel sale. Even though I own TONS of flannel (purchased on Black Friday 2006) I didn't have 9 different patterns that all coordinate. :)
Here's the end result:
So here's what I did!
In a Sudoku puzzle the numbers 1-9 appear 9 times each, but only once in each row, column and square. My quilt needed nine blocks each of nine different flannels.
I used my rag die to cut two layers of flannel at the same time. I place the same print wrong sides together before running it through the cutter so that my blocks were ready to quilt right after being cut. I find that two layers of flannel is plenty warm!
I assigned a number to each flannel and quilted them. Since this is a number game, I decided the quilting pattern just had to be numbers!! I wanted to use my embroidery machine, but I wanted the design to stitch QUICK since I had 81 of them to do. I decided the placement or tackdown stitch for an applique design would be perfect. I selected the 4" numbers from the Hannah font from 8 Claws and a Paw. They digitize their tackdowns with a nice long-stitch narrow zig-zag that stitched fast and looks more decorative than a simple running stitch -- it was perfect! I hooped my squares with no stabilizer using my Spring Hoop (first time using it-WONDERFUL for this project!) and plowed through them.
Here are closeup images of all nine blocks. My only regret is that I used white thread for all of them... should have used contrasting threads instead. Oh well! The #4 fabric was my inspiration fabric... found it first and the picked pinks, greens and purples to match. And in my opinion #7 looks better in person than in the pictures. :)
I launched my Electric Quilt program and created a quilt that was basically a nine-patch of nine-patches. I found a solved Sudoku puzzle and assigned each number a fabric and plugged it into my quilt. When I made the actual quilt I didn't include the black dividing lines (though considered adding a narrow sashing).
Then I made a tiny version of my quilt with 1" squares of the flannel. This was a VERY helpful step. I was able to see right away that I had two of the same prints side-by-side too often and swapped things around. Then as I was constructing it I had a handy guide to follow to be sure I didn't mess anything up. Because if you know Amy, you know she would certainly find my mistake. :)
With the blocks quilted and the plan in place, all I had left to do was piece the thing together! And here it is, my first Sudoku Rag Quilt!
Close up of the quilt so you can see the raggy seams and quilting:
I love the final product. I was secretly hoping Amy wouldn't like it and they could just ship it back to me. But she did. :) Maybe some day I'll get around to making one for myself. But don't hold your breath. ;)
And for those of you still reading, thanks! This was a special project, and I wanted to document it all for myself. To be honest, I wanted to to a big video tutorial (so I can earn myself a free die from AccuQuilt) but December isn't the best month of the year to tackle a project like that!
Sunday, May 30, 2010
Dashiell's Keekey Quilt
Before Dashiell was born I bought several yards of a blue flannel with a cute monkey print, intending on making him a rag quilt similar to Annaliese's butterfly quilt. I never moved forward on it, though:
1. I couldn't find coordinating flannel in local stores that I liked.
2. My MIL had an Accuquilt Studio die cutter with the rag dies--the thought of sparing myself all the snipping by hand really encouraged me to wait.
3. Ummm... and I had a baby at home!
So a year later when we went to IL for Christmas I took my flannel with me, intending to go fabric shopping there and die cut the squares while at the Trammels.
Upon arriving I was delighted to discover that my MIL had sold her studio machine and purchased two GO! machines, giving me one!! She also had sets of the flannel receiving blankets from Dashiell's crib bedding, which just so happen to match the monkey flannel. I got started right away cutting squares. You may remember because I blogged about it... FIVE months ago... I got everything cut really quickly, and even started quilting and piecing, but got interrupted by gifts and orders... and time passed.
Finally last week I decided for my birthday I wanted to get his quilt done. I worked on it exclusively for two days, and it's complete!! Here it is displayed in Dashiell's room:

I love that it coordinates with his crib bedding. You can see we have lots of monkey items. That little monkey sitting in the corner of his crib is his favorite, he calls him Keekey. When Dashiell first saw the quilt he exclaimed, "Keekey!" Then when I laid it out to take this picture, he said, "WOW!" It was adorable. :)

It's about 45"x58", which will be a great size for his toddler bed when that time comes. This is a close-up of the back. It's easier to see the quilt pattern (four-patches alternating with large blocks) and fabric motifs without all the fraying in the way.

It was not difficult at all to piece the quilt with the blocks pre-fringed. And it was SO WONDERFUL to not have to sit and snip it for hours! The fringe is 3/4" long, so it's pretty raggy. Here's a close-up after just one washing. It will continue to fray and get softer as time goes by:

I'm so glad to have this project completed! Now if I could just return to the Churn Dash baby quilt I started for him... I may have to take a week off this summer from sewing for others and try to crank it out.
1. I couldn't find coordinating flannel in local stores that I liked.
2. My MIL had an Accuquilt Studio die cutter with the rag dies--the thought of sparing myself all the snipping by hand really encouraged me to wait.
3. Ummm... and I had a baby at home!
So a year later when we went to IL for Christmas I took my flannel with me, intending to go fabric shopping there and die cut the squares while at the Trammels.
Upon arriving I was delighted to discover that my MIL had sold her studio machine and purchased two GO! machines, giving me one!! She also had sets of the flannel receiving blankets from Dashiell's crib bedding, which just so happen to match the monkey flannel. I got started right away cutting squares. You may remember because I blogged about it... FIVE months ago... I got everything cut really quickly, and even started quilting and piecing, but got interrupted by gifts and orders... and time passed.
Finally last week I decided for my birthday I wanted to get his quilt done. I worked on it exclusively for two days, and it's complete!! Here it is displayed in Dashiell's room:

I love that it coordinates with his crib bedding. You can see we have lots of monkey items. That little monkey sitting in the corner of his crib is his favorite, he calls him Keekey. When Dashiell first saw the quilt he exclaimed, "Keekey!" Then when I laid it out to take this picture, he said, "WOW!" It was adorable. :)

It's about 45"x58", which will be a great size for his toddler bed when that time comes. This is a close-up of the back. It's easier to see the quilt pattern (four-patches alternating with large blocks) and fabric motifs without all the fraying in the way.

It was not difficult at all to piece the quilt with the blocks pre-fringed. And it was SO WONDERFUL to not have to sit and snip it for hours! The fringe is 3/4" long, so it's pretty raggy. Here's a close-up after just one washing. It will continue to fray and get softer as time goes by:

I'm so glad to have this project completed! Now if I could just return to the Churn Dash baby quilt I started for him... I may have to take a week off this summer from sewing for others and try to crank it out.
Tuesday, December 29, 2009
My New Toy!
Believe it or not, this is the 400th post on my "Stitched by Janay" blog. CRAZY. At times I find myself very frustrated that I can't accomplish as much as I want, but when I look back (especially through the Picasa web albums associated with my blog) I am pretty amazed at what all I've stitched in the last two and a half years while being a SAHM of little kids. It's been so fun to embroider personalized items, document exactly what I did and share pictures online, initially with just my mom and MIL, but now with all of you who follow my blog.
In the last month I have FINALLY joined Facebook, and I've created a fan page for Stitched by Janay -- please come join the fun by becoming a fan. I plan to upload pictures to different albums to make it easier to browse, and as I figure it all out I hope to create an album where you can add pictures of your own Stitched by Janay items in use. Have no fear -- if you aren't on Facebook and don't want to join, I will continue to update this blog as usual (it will just feed directly into Facebook).
Before I sign off on this 400th post, I wanted to share pictures of my new toy!

My MIL Kathy gave me an Accuquilt GO! Fabric Cutter along with the rag dies. I am SO EXCITED. I have already started cutting a rag quilt for Dashiell which I have been putting off for a while. I'm anxious to get it done and enjoy how much time the die cutting process is going to save me -- no more snipping a quilt for hours!
This afternoon I cut out all the small blocks for the quilt:


The flannel for the small blocks are receiving blankets that match Dashiell's crib bedding. The big squares will be from this cute monkey flannel I bought a while back. Here is the quilt design that I'm using, and a preview of what it will look like:


Hopefully the final product will be posted here sooner than later! :)
In the last month I have FINALLY joined Facebook, and I've created a fan page for Stitched by Janay -- please come join the fun by becoming a fan. I plan to upload pictures to different albums to make it easier to browse, and as I figure it all out I hope to create an album where you can add pictures of your own Stitched by Janay items in use. Have no fear -- if you aren't on Facebook and don't want to join, I will continue to update this blog as usual (it will just feed directly into Facebook).
Before I sign off on this 400th post, I wanted to share pictures of my new toy!

My MIL Kathy gave me an Accuquilt GO! Fabric Cutter along with the rag dies. I am SO EXCITED. I have already started cutting a rag quilt for Dashiell which I have been putting off for a while. I'm anxious to get it done and enjoy how much time the die cutting process is going to save me -- no more snipping a quilt for hours!
This afternoon I cut out all the small blocks for the quilt:


The flannel for the small blocks are receiving blankets that match Dashiell's crib bedding. The big squares will be from this cute monkey flannel I bought a while back. Here is the quilt design that I'm using, and a preview of what it will look like:


Hopefully the final product will be posted here sooner than later! :)
Monday, November 5, 2007
Flannel Rag Quilts for Sale
In addition to my crayon rolls and Amy's headbands, I will also be taking my flannel rag quilts to "Christmas at the Holiday Inn". Two of them have been posted previously here. The others are:
Noah's Ark Flannel Rag Quilt

Bugs Galore Flannel Rag Quilt

You can learn more about my rag quilts at my online gallery Janay's Quilts
Noah's Ark Flannel Rag Quilt

Bugs Galore Flannel Rag Quilt

You can learn more about my rag quilts at my online gallery Janay's Quilts
Saturday, September 29, 2007
Eureka's Baby Shower Gift
1 comments
Posted by
Janay at 2:06 PM
Labels: baby gift, burp cloth, pacifier clip, rag blanket, snowbabies
Today was baby shower #3 of our current baby boom at church! Eureka and Chris are expecting a baby girl and plan to name her Kylie. My gift consists of a flannel rag-tag blankie, a Snowbaby, a pacifier clip, and two burpcloths:

The design for the Snowbabies comes from The Embroidery Market. I used Embird Alphabet #33 to add the text on the Snowbaby and Pacifier Clip.

The first burp cloth is one for Eureka to use, girly with the ever popular pink/brown combination. The design is from a Dot Alphabet that I got on Sew Forum. Kathy digitized the name "Kylie" for me in a font (Acadian) that works perfectly with this alphabet.

The second burp cloth is perfect for Chris to use! I added the text to the clapboard design using Embird Alphabet #2. I love how this black and white ribbon looks like film!

The design for the Snowbabies comes from The Embroidery Market. I used Embird Alphabet #33 to add the text on the Snowbaby and Pacifier Clip.

The first burp cloth is one for Eureka to use, girly with the ever popular pink/brown combination. The design is from a Dot Alphabet that I got on Sew Forum. Kathy digitized the name "Kylie" for me in a font (Acadian) that works perfectly with this alphabet.

The second burp cloth is perfect for Chris to use! I added the text to the clapboard design using Embird Alphabet #2. I love how this black and white ribbon looks like film!
Wednesday, July 25, 2007
Flannel Rag Quilts for Sale
Today I went to Artsy Phartsy Chics, a local shop that sells "Cool Gifts For Hip Chics". They do consignment, so I left two of my quilts there to see if they'll sell, both Celestial Sky Rag Quilts:


You can learn more about my rag quilts at my online gallery Janay's Quilts
UPDATE: Just as I was trying to decide whether to leave my quilts there, the store closed due to one of the partners retiring. That made my decision easy! ;) They are still for sale, though...


You can learn more about my rag quilts at my online gallery Janay's Quilts
UPDATE: Just as I was trying to decide whether to leave my quilts there, the store closed due to one of the partners retiring. That made my decision easy! ;) They are still for sale, though...
Sunday, July 8, 2007
Rachel's Baby Shower gift
1 comments
Posted by
Janay at 4:40 PM
Labels: baby gift, burp cloth, pacifier clip, rag blanket, snowbabies
This baby shower gift was for Rachel. Her baby is due at the end of August, and we had a shower for her this afternoon...

Included were two different styles of burp cloths. One, "Teacher's Pet" was posted previously. I made the "Cute as a Button" out of three layers of flannel with fabric added to the ends/back. The design came from Charming Station.

Next was a rag style flannel blankie with loops of ribbon -- a great sensory item.

I also made a Snow Baby (design from The Embroidery Garden), adding the "S" to personalize it.

Finally I did a pacifier clip, personalizing the ribbon with their last name.

Once the darling baby is born and named, Rachel will get a few more personalized items!

Included were two different styles of burp cloths. One, "Teacher's Pet" was posted previously. I made the "Cute as a Button" out of three layers of flannel with fabric added to the ends/back. The design came from Charming Station.

Next was a rag style flannel blankie with loops of ribbon -- a great sensory item.

I also made a Snow Baby (design from The Embroidery Garden), adding the "S" to personalize it.

Finally I did a pacifier clip, personalizing the ribbon with their last name.

Once the darling baby is born and named, Rachel will get a few more personalized items!
Subscribe to:
Posts (Atom)