Saturday, April 14, 2012

Frayed Layered Star onesie

1 comments
Original Stitches posted a freebie design on their Facebook page, with a cool challenge for the month... if you post a picture of your stitchout, you can request another free design of your choice! First of all, it's a cute design, so yay! But I've been eying this cool stethoscope design, so I jumped at the chance to get it for free. :)
I put the Frayed Layered Star on a 0-3 month sized onesie I had in my stash. I plan to send this to a sweet little girl who should be born just before July 4th. :)
Frayed or raggy designs are such a nice quick way to put a big design on such a tiny item. Only 4 minutes on my machine, all trimming done afterwards when it's out of the hoop. Now that's my kind of onesie design! I've done a three layered frayed star design before, but I really like the look of this rounded version!
 The challenge continues... if I post a picture of the stethoscope design, I can get another freebie. BUT we have a crazy couple of weeks coming up getting ready for company and graduation, so I'm not sure I can squeeze it in amongst my remaining orders and sewing projects. We'll see. Anyone dying to own something with that design on it? Shoot me an email. :)

Thursday, April 12, 2012

Priceless gifts :)

3 comments
My dear friends Jason and Anna contacted me about making a gift set for our mutual friends that were expecting a baby girl. They were keeping her name a secret until birth, so we had to be a touch more creative.
Jason really wanted to incorporate their last name, Price, into a gift in a clever way. We settled on "Priceless", isn't that perfect for a little girl?!?
I used the Sherry font from 8 Claws and a Paw, and added a crown that I plucked off of another design... no record of that one though!
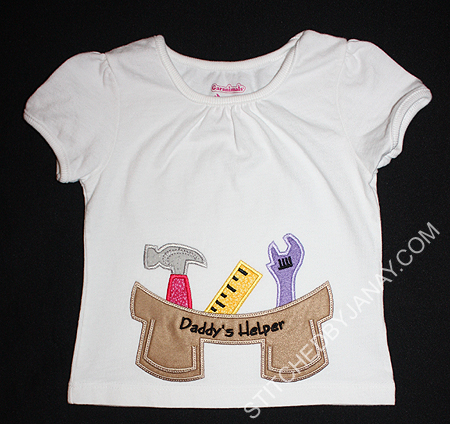
Daddy owns his own business as a contractor, so Anna suggested a tool belt shirt:
This adorable tool belt applique design from DigiStitches. I used a brown suede-like material for the belt, and added "Daddy's Helper" with Embird Alphabet #14.
 And finally, Jason is a big nerd :) and wanted to share his nerdyness with sweet baby Price, even though Mom and Dad really aren't nerds themselves. This definitely reflects who it's from more than who it's for. :)
(I digitized this for personal use only)

Tuesday, April 10, 2012

Happy Birthday, Annaliese!

4 comments
Today my little girl is EIGHT! I can't even believe it! Happy Birthday Annaliese!
Like last year, we found these cute capris and made a birthday shirt to match. I love the colors (although to be honest, these photos aren't the most accurate reflection of them, oh well.)
The Birthday Collage design is still in the testing stages, I'll let you know when it's available for purchase on Lynnie Pinnie's site. :)

I have so very much enjoyed getting to make Annaliese birthday shirts through the years... care to walk down memory lane with me? Fourth birthday, ice cream themed party with her friend whose birthday was yesterday:
 fifth birthday:
 sixth birthday:
 and seventh birthday:

Monday, April 9, 2012

Name Pillow

1 comments
It's kind of getting hard to come up with gift ideas for one of my daughter's best friends... I've already made so many different things for Kylie! Since she had a slumber party for her birthday this year I decided to do my first applique name pillow:
I've seen lots of examples over the years, but most recently have been inspired by some posted by Lyn on 8CP's Facebook wall (here and here for example). I love flipping through fan albums on FB! Lyn graciously answered some questions for me about size of pillow and letters, and confirmed that if I merged all the letters in my 6x10 hoop I would end up with a good sized pillow. (If you want a detailed tutorial, she recommends the one from Kimberbell Kids.)
Kylie already has her name on her bedroom wall with wooden letters in the Tinker Toy font, so I selected the Dotty Applique Alphabet from Embroidery Boutique, using the zigzag finish for the quick stitch. All five letters fit in my 10" hoop perfectly! By the time I added a 2" pieced border around the center panel, I ended up with a 12x16" rectangle so I could use a pillow form instead of stuffing my own. Yay!
I selected the colors to coordinate with her bedding. I was excited to rediscover the aqua floral fabric in my stash which I also used for the back of the pillow. I constructed the back to have two overlapping panels so it would be easy to remove for washing if need be. (It also meant I didn't have to whip stitch an opening closed!) Here it is on her bed:
I enjoyed doing this. I've been interested in trying it, but not anxious to tackle one for Annaliese -- her pillow will probably be two feet long! Ha! Alas, now that Kylie has one, I'm sure she's going to ask me sooner or later...

Saturday, April 7, 2012

Ready for Baseball Season 2012

10 comments
I have friends that are huge Orioles fans and celebrate opening day of baseball season like it's a holiday. :) Three of the past four years (2008, 2009, 2010) I made special shirts for the kids to wear. Last year they were ready for a new look -- the kids were outgrowing that monogram. Kelli and Daisha found a screenprint tee online that they liked, and asked if I could recreate the look. The reality was that I couldn't recreate it at the same price, so I bowed out. Disappointed... but their shirts were really cool!
However, when I posted Dashiell's applique script name shirt in January I figured I might have gotten my job back. ;) After lots of brainstorming and emails back and forth, here are the kids ready for baseball season 2012!
Aren't these shirts awesome!?!? This has been one of my all-time favorite projects and it's been a long 3-4 weeks keeping it quiet! :)
So here's the backstory:
I created their names in Embird using the Applique Script Alphabet by Hang To Dry Applique and sent preview images. Daisha came back with a suggestion (because they are ALWAYS stretching me beyond my current ability level, hahahaha!). Here is her mock-up based on an Orioles shirt:
So I had two things to figure out -- how to outline it in white, and how to add the underline. Since the alphabet is digitized with a triple bean stitch, I figured I could relatively easily digitize my own underline for the names (which I did, woo-hoo!). But I am not Embird Studio savvy enough to figure out how to add an echo satin stitch to something that already exists. So instead I suggested using the next best thing -- fabric! 
This technique went pretty fast at the machine. I got the shirt hooped. I put Heat-n-Bond Lite on a layer of white fabric and a layer of orange fabric. I cut them larger than my hoop to be sure it was big enough for the whole design so I could skip the placement stitches (saves time!!). I laid down the two layers of fabric and stitched the triple bean stitch design and was done doing the embroidery!
Now came the tedious part -- trimming. But this could be done sitting on the couch watching TV with the kids, so it wasn't nearly as restrictive as a complicated design that you have to monitor at the embroidery machine. I first trimmed the orange as close as I could to the stitching line. (Remember I used HNBL so I shouldn't have to worry about fraying or the fabric pulling away from the stitches.)
Next I trimmed away the white leaving about a 1/4" echo patch around it. And then I pressed it really well to get the HNBL to adhere the fabric to the shirt.
Thankfully the mommies were pleased with the results, and I moved on to the other three shirts. They needed a shorter underline that had to be digitized separately, but I was able to use the new one for all three:
The one final detail that was added to each shirt: A baseball on the back of the shirt near the neckline. The "12" commemorates the year.
I used an applique baseball but deleted the satin stitch step and instead stitched the tackdown line a couple more times. I use Embird Alphabet #14 for the 12.
This was such a fun project! I always enjoy working on things for the Sheets clan -- they keep me on my toes and I'm always growing. It's awesome.
~~~~~~~~~~~~~~~~~~~~~~~~~~~~~~~~~~~~~~~~~~~~~~~~~
UPDATE: After numerous requests, Crissie at HTD has digitized her own version of a "tail" to go with the applique script. It is available on her site as a part of a power-packed fundraising set: Garden Valley Optimist Football Design Pack

Wednesday, April 4, 2012

My springtime kitchen towel

1 comments
Applique Forum initiated a monthly challenge in March, which I participated in. We were each given Hang To Dry's Vintage Luxe Bunny in Scallop design and asked to think outside the box and stretch ourselves -- use a fun type of fabric or embellishment, manipulate the design somehow... the possibilities were wide open, how fun!

At the same time that this challenge began, I was in the midst of three big custom orders (which I still haven't been able to share yet...but soon!) so my creative juices were TAPPED DRY. I finally decided that I would put the bunny on a shirt for Annaliese and let her pick all of the fabrics and threads, that would be completely out of my comfort zone, HA! But alas, even though it's a lovely design, it wasn't a style she was interested in and she declined my offer. The clock was ticking... She did end up helping me out by giving me a suggestion -- she reminded me that I didn't have any Easter towels for my kitchen, so my "outside of the box" angle was a non-springtime color theme!
The fabric for the scallop is a scrap from when I made my kitchen/dining room valences. All of the off-white tone-on-tone prints were scraps from a quilt I made years ago. The thread colors I picked really show off the variety of deco stitches used in the vintage luxe designs. I also took this as an opportunity to finally use the Hand Lettered Floss Stitch font I purchased from Jolson's a while back. Oh, it looked so perfect in Embird, but the word "Spring" gets lost on the busy fabric, can you even see it?! :)
The neatest part in participating in a challenge is seeing what other people do with the exact same design. About 70 people participated and no two were alike!
And in case you are wondering, I did not win in my category. I was up against a phenomenal entry, with an amazing runner up (totally not fair) so I was lucking to get my three measly votes. But April is a new month! :)

Tuesday, April 3, 2012

Welcoming Baby Alexis

2 comments
Sunday we had a baby shower at church and I stitched a few items for baby Alexis.
Cherri requested a name banner (using the Frayed Block Letters from Hang To Dry) as part of the hostess gift:
Michelle requested a burp cloth. We looked over the registries and saw lots of purples and butterflies, so I used Lynnie Pinnie's Applique Patriotic Butterfly (minus the stars) and (appropriately) the Alexis font from 8 Claws and a Paw to add her name.
My gift was one of those rare opportunities where procrastination really paid off. :) Friday morning I still hadn't decided what I was going to do, and I woke up with a cute swirly girly whale in my inbox to test for Lynnie Pinnie. Woo-hoo! I picked this polka dot ribbon for the colors, and Itty Bitty from 8CP for her name.
Remember that cute owl I tested for Sheila last month? Well Friday afternoon she posted this cute little bear requesting a tester. Again procrastination paid off and I used it that night for this bib! (Sheila is not selling her designs yet, but you can follow her on facebook: Savvy Stitches Applique.) I used 8CP's Dorthy to add her name.

Monday, April 2, 2012

Welcoming Baby Brayden

0 comments
Debbie's daughter is expecting a baby boy, so she ordered a couple burp cloths for him:
When she contacted me about the order she shared what bedding set her daughter was registered for:
I immediately thought of the Riley Blake striped fabric I had and some turtle embroidery designs. After sharing a few links we settled on Lynnie Pinnie's Applique Turtle. Before getting started I took the fabric to church and she brought me a blanket from the bedding set -- you would not believe how PERFECTLY the RB stripe matches this set! I was so giddy!
I spent a couple days trying to decide how to use the stripe fabric. One idea was easy peasy; I just reused the embroidery file from a Brayden burp cloth I made last fall but used the stripe instead. The "B" is from Embroidery Boutique's Fun Applique Alphabet, and I added the name with Whoa Nelly From 8 Claws and a Paw.
For the turtle burp cloth I really didn't want to use the stripe on the actual turtle, so I decided to use fabric on the end of the burp cloth instead of my traditional piece of ribbon. Ummmmm.... confession time, I think I've only done that once before and it was in 2007! So I was going to have to suck it up and ask for assistance on construction method... but before having to do so Charming Station posted this video tutorial! Yay for perfect timing! It worked pretty well. The major thing I did different was tucking the ends under on the back side instead of the front side. I also used some steam-a-seam on the front before stitching so it wouldn't shift -- I didn't want those stripes to be really wonky. I should have used my walking foot... I'll remember that next time. It turned out so cute!

Sunday, April 1, 2012

My worst stitchout ever, and how I fixed it

4 comments
So I'm about a month shy of having blogged for five years. And I have blogged about virtually every sewing project I have done in that time. I guess that's why I feel compelled to document my disastrous night of sewing last night. And I wish that I could tell the tale, you notice today's date and think "April Fools!" But alas, this is true.

I was working on my daughter's birthday shirt. It's a pretty involved design (9 different applique pieces) and we had already spent a lot of time picking fabrics and thread colors for each and every element -- it matches a cute pair of plaid shorts we found. I picked a big design and use the 6x10 hoop on my Brother. I got all fabrics tacked down and it looked lovely! But then once the satin stitches got going... puckering, and I mean MAJOR puckering started to occur. I probably should have stopped, but I decided to trudge on, hoping I could just press it out later. Clearly I need to work on my hooping technique with this larger hoop... the method I use flawlessly with my Janome hoops did not work in this case. As things continued the stabilizer was less and less taut.
THEN midway through a thread nest. WHY?? I have no idea, but I had to jiggle the hoop quite a bit to get it loose from the machine and trim all that excess thread away. The stabilizer was very loose now. I tried my best to tighten the stabilizer back up, but the design had shifted. I carried on, skipping a few sections to come back to later, and finished the design.
After some sleep and a fresh attitude, I worked on it again this afternoon. On the backside I trimmed out all of the polymesh stabilizer between all the elements, and then pressed the shirt to death. It's still puckery, but looks better than last night. Since that was semi-successful I decided to try to fix the part of the design I skipped over last night.

AND this is why I'm writing about it, maybe the following tip will be beneficial to those of you who do applique work, if you ever find yourself in this predicament.

As I started to stitch the satin stitches around this party hat, it was obvious that it wasn't going to line up with the fabric at all!
Sometimes when this happens I'm able to use the arrow keys on my machine to move the needle to the left or right to force it to line up, but this design completely filled the width of the hoop and I couldn't use that technique. So I stopped stitching, jumped ahead to a different part of the design (where the alignment wasn't as far off) and finished it out.

To fix the hat, first I picked out all of those misplaced zigzag stitches. Then I ran back to Embird and separated out that hat from the rest of the design (placement, satin stitches and decorative top). I centered that in my small hoop, saved it as new file and headed back to my machine. I hooped sticky stabilizer and stitched the placement stitch:
Then I laid my shirt directly on top of that lining up the fabric hat that was already tacked down with the placement stitches on the stabilizer. I redid the satin stitches and accent on top, and voila! The hat looks like it's supposed to!
So I'm pretty pleased with that little save. :)

This afternoon I showed the shirt to my daughter and she couldn't see what was wrong with it (even though the puckering is glaring in my opinion). My husband pointed out that it will be on a moving kid and will likely get smeared icing or spilled punch on it. So we are making this work. I wouldn't sell it or give it away, but thankfully my daughter is gracious enough to love it anyway.

And when I'm in a better mood (hopefully by her birthday next week) I'll share pictures of the entire shirt. Stay tuned.

Labels


Statcounter

Followers

My Blog List

Stitched By Janay Original Template Copyright 2008, based on Shoppaholic Designed by Ipiet Templates